 ×
×
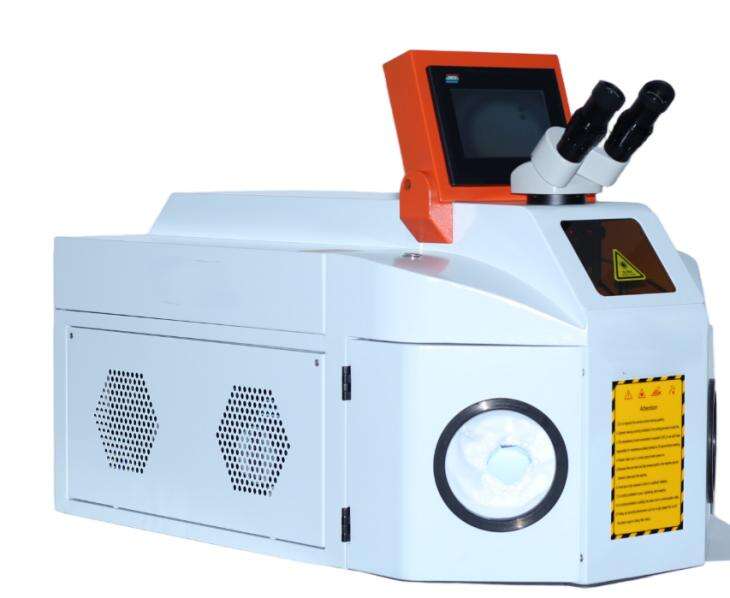
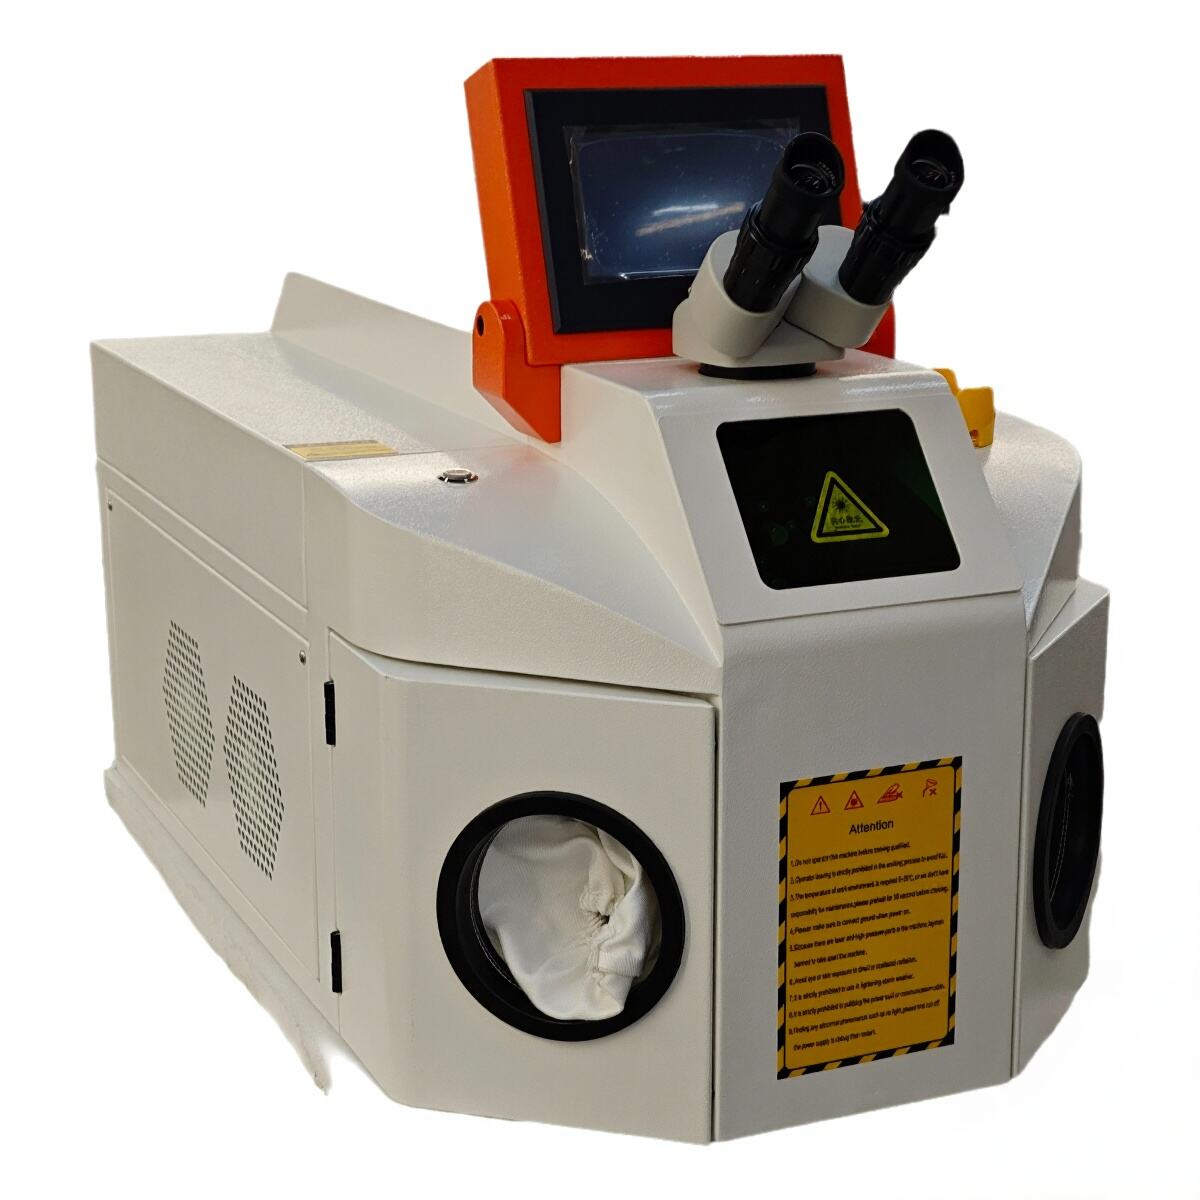
In the realm of jewelry manufacturing and repair, traditional welding methods often face challenges such as excessive heat impact, noticeable deformation, rough weld points, and low efficiency. Our specialized jewelry laser welding machine, however, utilizes high-precision pulsed laser technology to provide professional-grade welding solutions for precious metals—including gold, silver, platinum, and titanium alloys. It empowers jewelry artisans to effortlessly execute intricate repairs, stone setting, restoration, and innovative designs.Jewelry Laser Welding Machine—Perfecting Exquisite Craftsmanship, Empowering Artisans with Greater Efficiency!
Jewelry Laser Welding Machines: A Revolutionary Tool for Precision Craftsmanship, Ushering in a New Era of Artisanal Excellence
In the realm of jewelry creation and repair, traditional welding techniques have long presented challenges for artisans—often characterized by significant heat-affected zones, susceptibility to deformation, and rough weld points. The jewelry laser welding machine, built upon core high-precision pulsed laser technology, offers a non-destructive and highly efficient welding solution for precious metals such as gold, silver, platinum, and titanium alloys. It has since become standard equipment across the global jewelry industry, ranging from small artisanal workshops to large-scale manufacturing facilities. This technology not only embodies the century-long evolution of laser welding but also spearheads a transformative leap in jewelry manufacturing toward greater intelligence, personalization, and sustainability.
Evolutionary Journey: From Laboratory Research to Artisanal Mastery
Laser welding technology traces its origins to the birth of the laser in the 1960s. Following the invention of the first laser by American scientists in 1960, experimental laser welding commenced in 1962, culminating in the first successful demonstration of industrial application in 1967. Beginning in the 1970s, laser welding gradually penetrated the field of precision manufacturing, gaining rapid traction—particularly within the jewelry sector. Processes initially developed for high-value precision welding in medical and aerospace applications were subsequently introduced into jewelry production, thereby fundamentally transcending the limitations inherent in traditional flame-based welding techniques. In the early 21st century, driven by breakthroughs in YAG laser waveform control and energy feedback technologies, Chinese enterprises—such as Han's Laser and HGTECH—spearheaded localized innovation, transforming these devices from expensive imported luxuries into widely accessible tools. Today, having undergone over six decades of iterative refinement, this technology has transitioned from a "high-tech, cutting-edge" laboratory curiosity into an indispensable "everyday tool" within jewelry workshops. The global market for jewelry laser spot welding machines reached a valuation of $400 million in 2026; it is projected to surpass $660 million by 2035, demonstrating a compound annual growth rate (CAGR) of 5.6%.
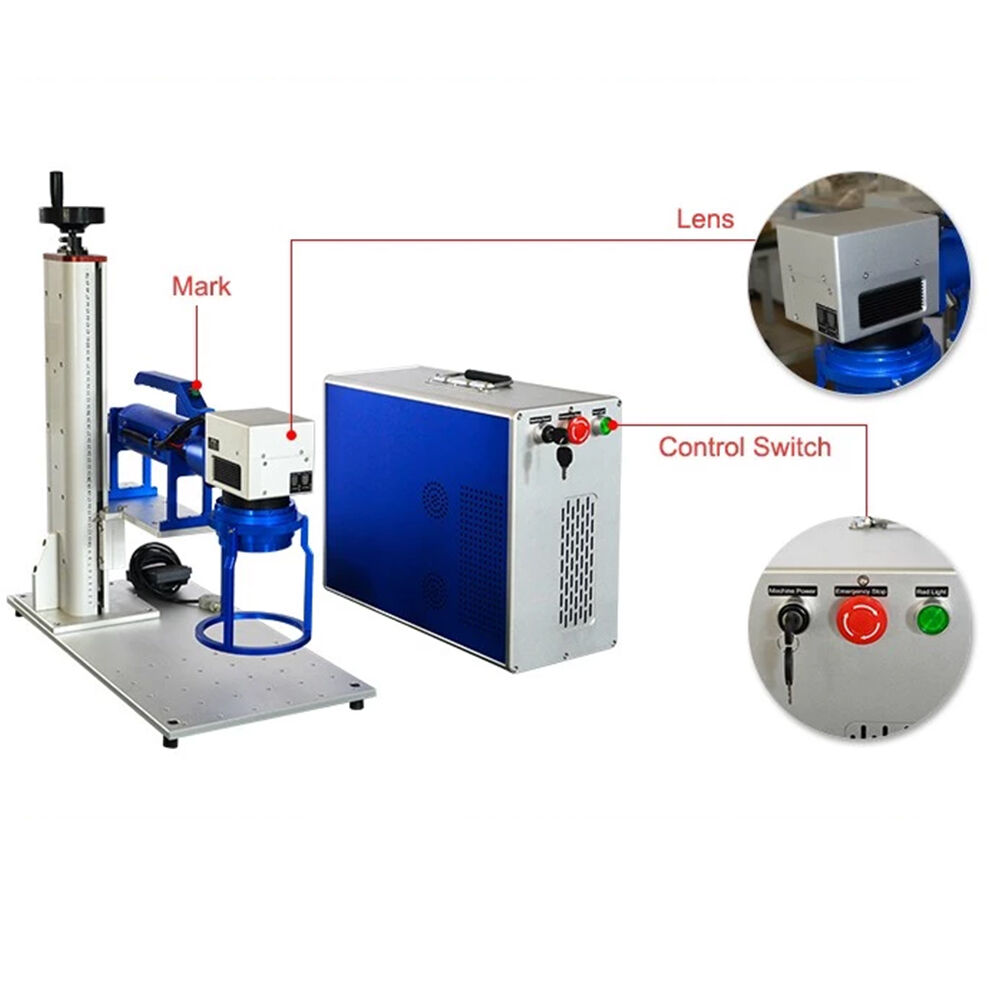
Detailed Description:
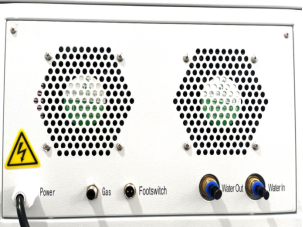
Laser Power Supply
Supplies electrical power to the xenon lamp (includes a parameter adjustment screen, main control board, and ignition board).
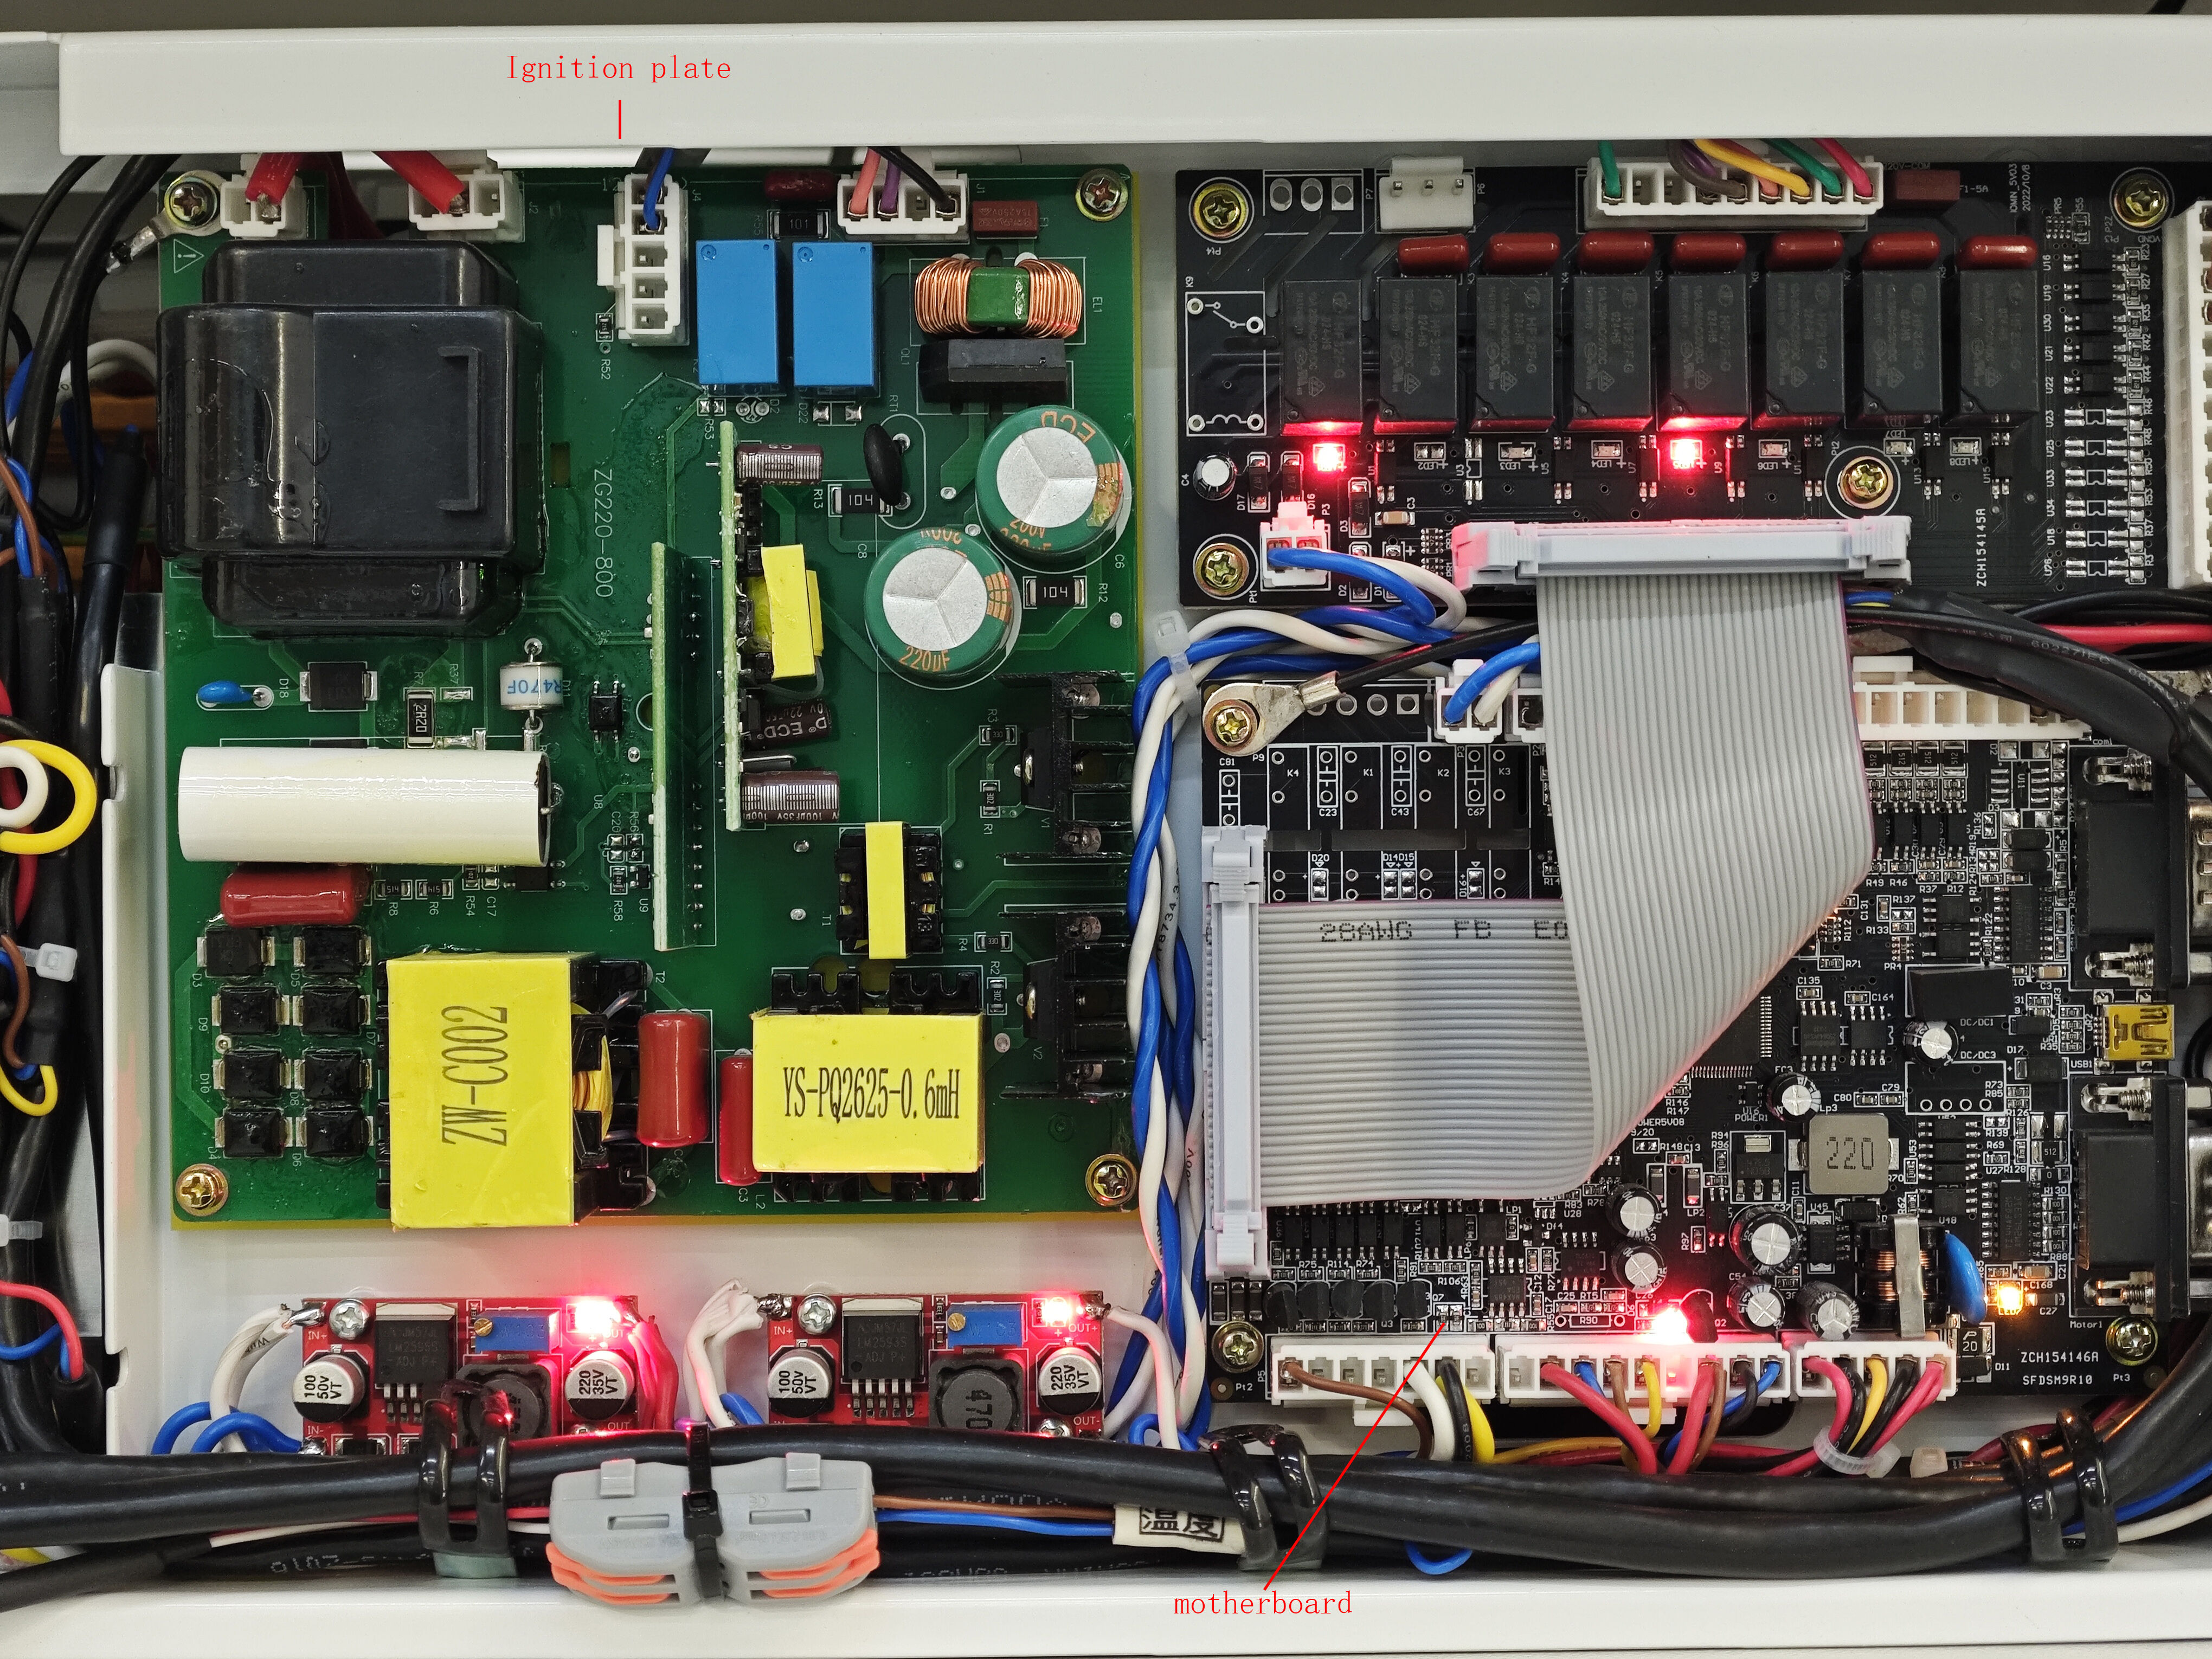
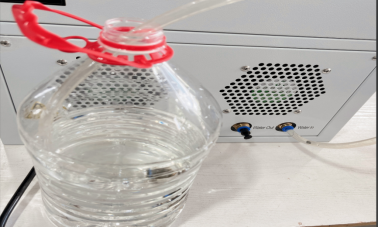
Cooling System
Dissipates heat from the laser cavity (includes water tank, heat sink, fan, water flow switch, water intake pump, circulation pump, and water level switch).
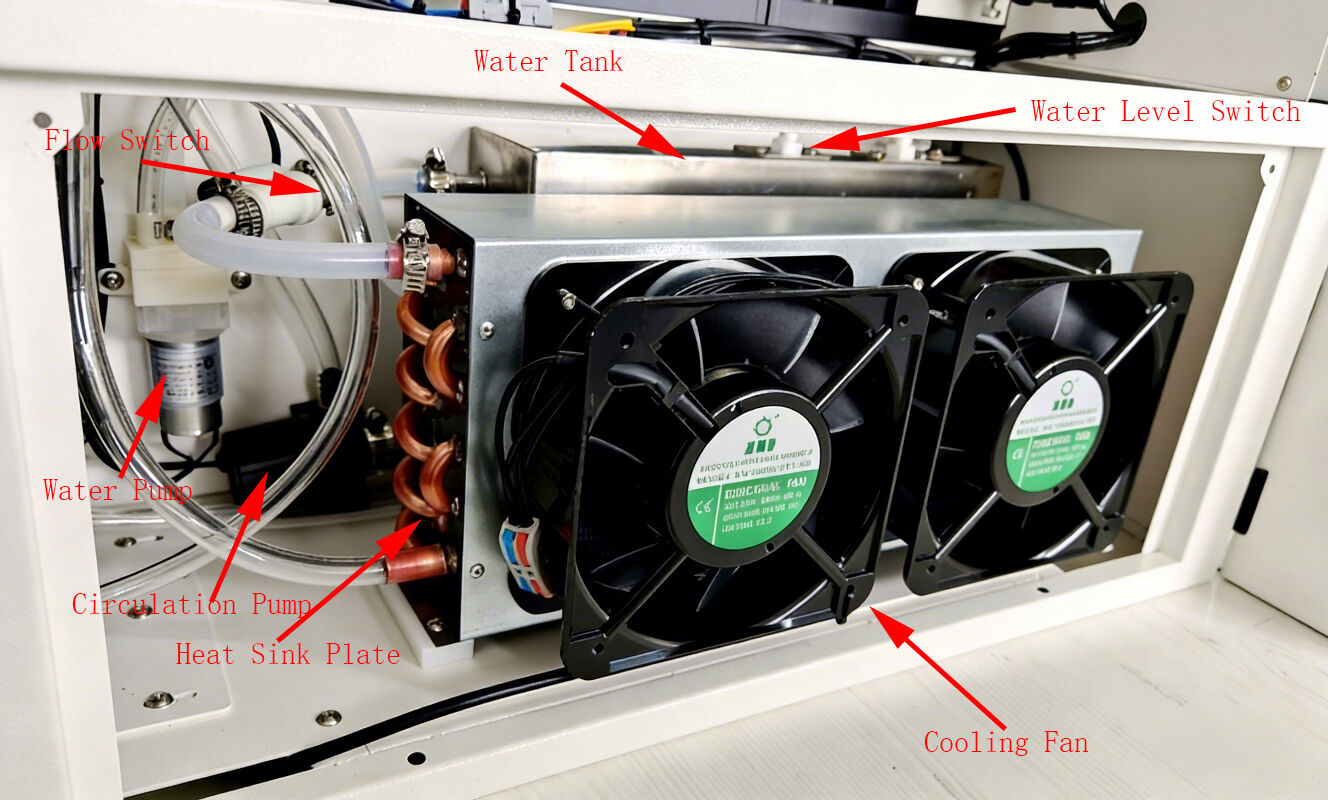
Pressing the water-fill button activates the water pump, drawing water from the external bucket into the internal water tank. The pump automatically shuts off once the tank is full (this process takes approximately one minute and transfers about 4 liters of water; please use distilled or industrially purified water). The button then returns to its raised position. Once water is present in the tank, the circulation pump activates, drawing water from the tank into the laser cavity. Cold water enters the laser cavity, while heated water flows out into the heat sink plate. The cooling fan activates at 25°C to cool the water within the heat sink plate, after which the water passes through a flow switch and returns to the tank.
Optical System
Laser Generation (Total Reflector, Partial Reflector, Crystal, Xenon Lamp, Laser Cavity, Beam Expander, 45-Degree Reflector, Focusing Lens)
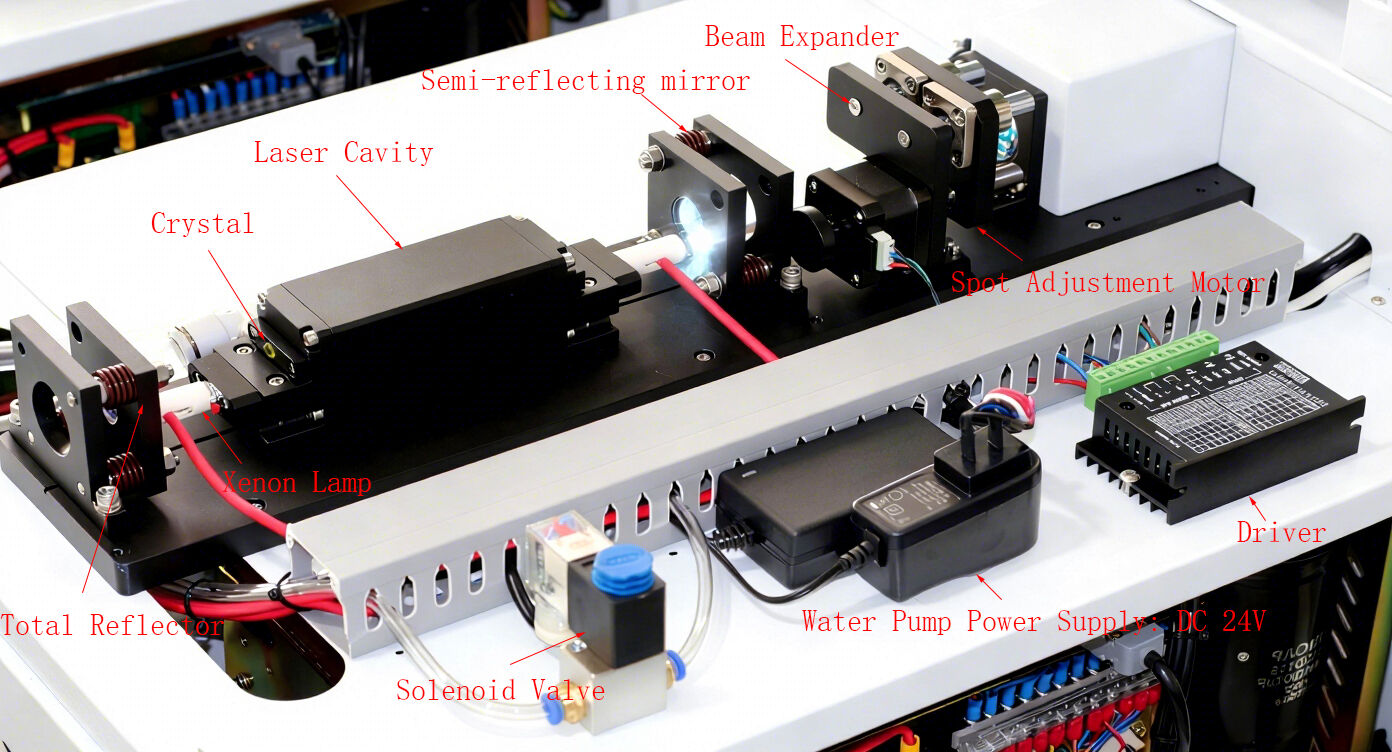
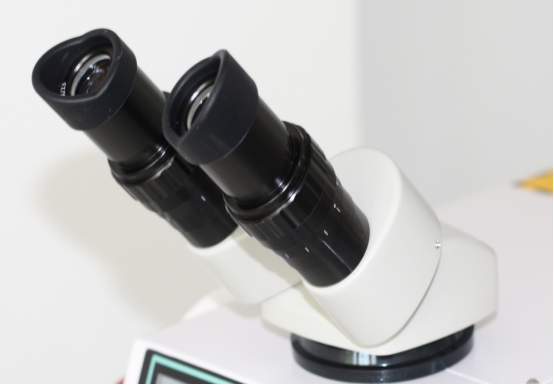
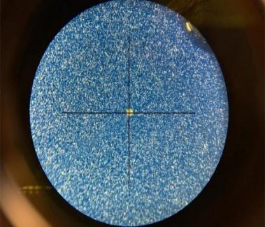
Binocular eyepiece, 10x magnification, with a reticle in the right eyepiece (15x magnification also available).
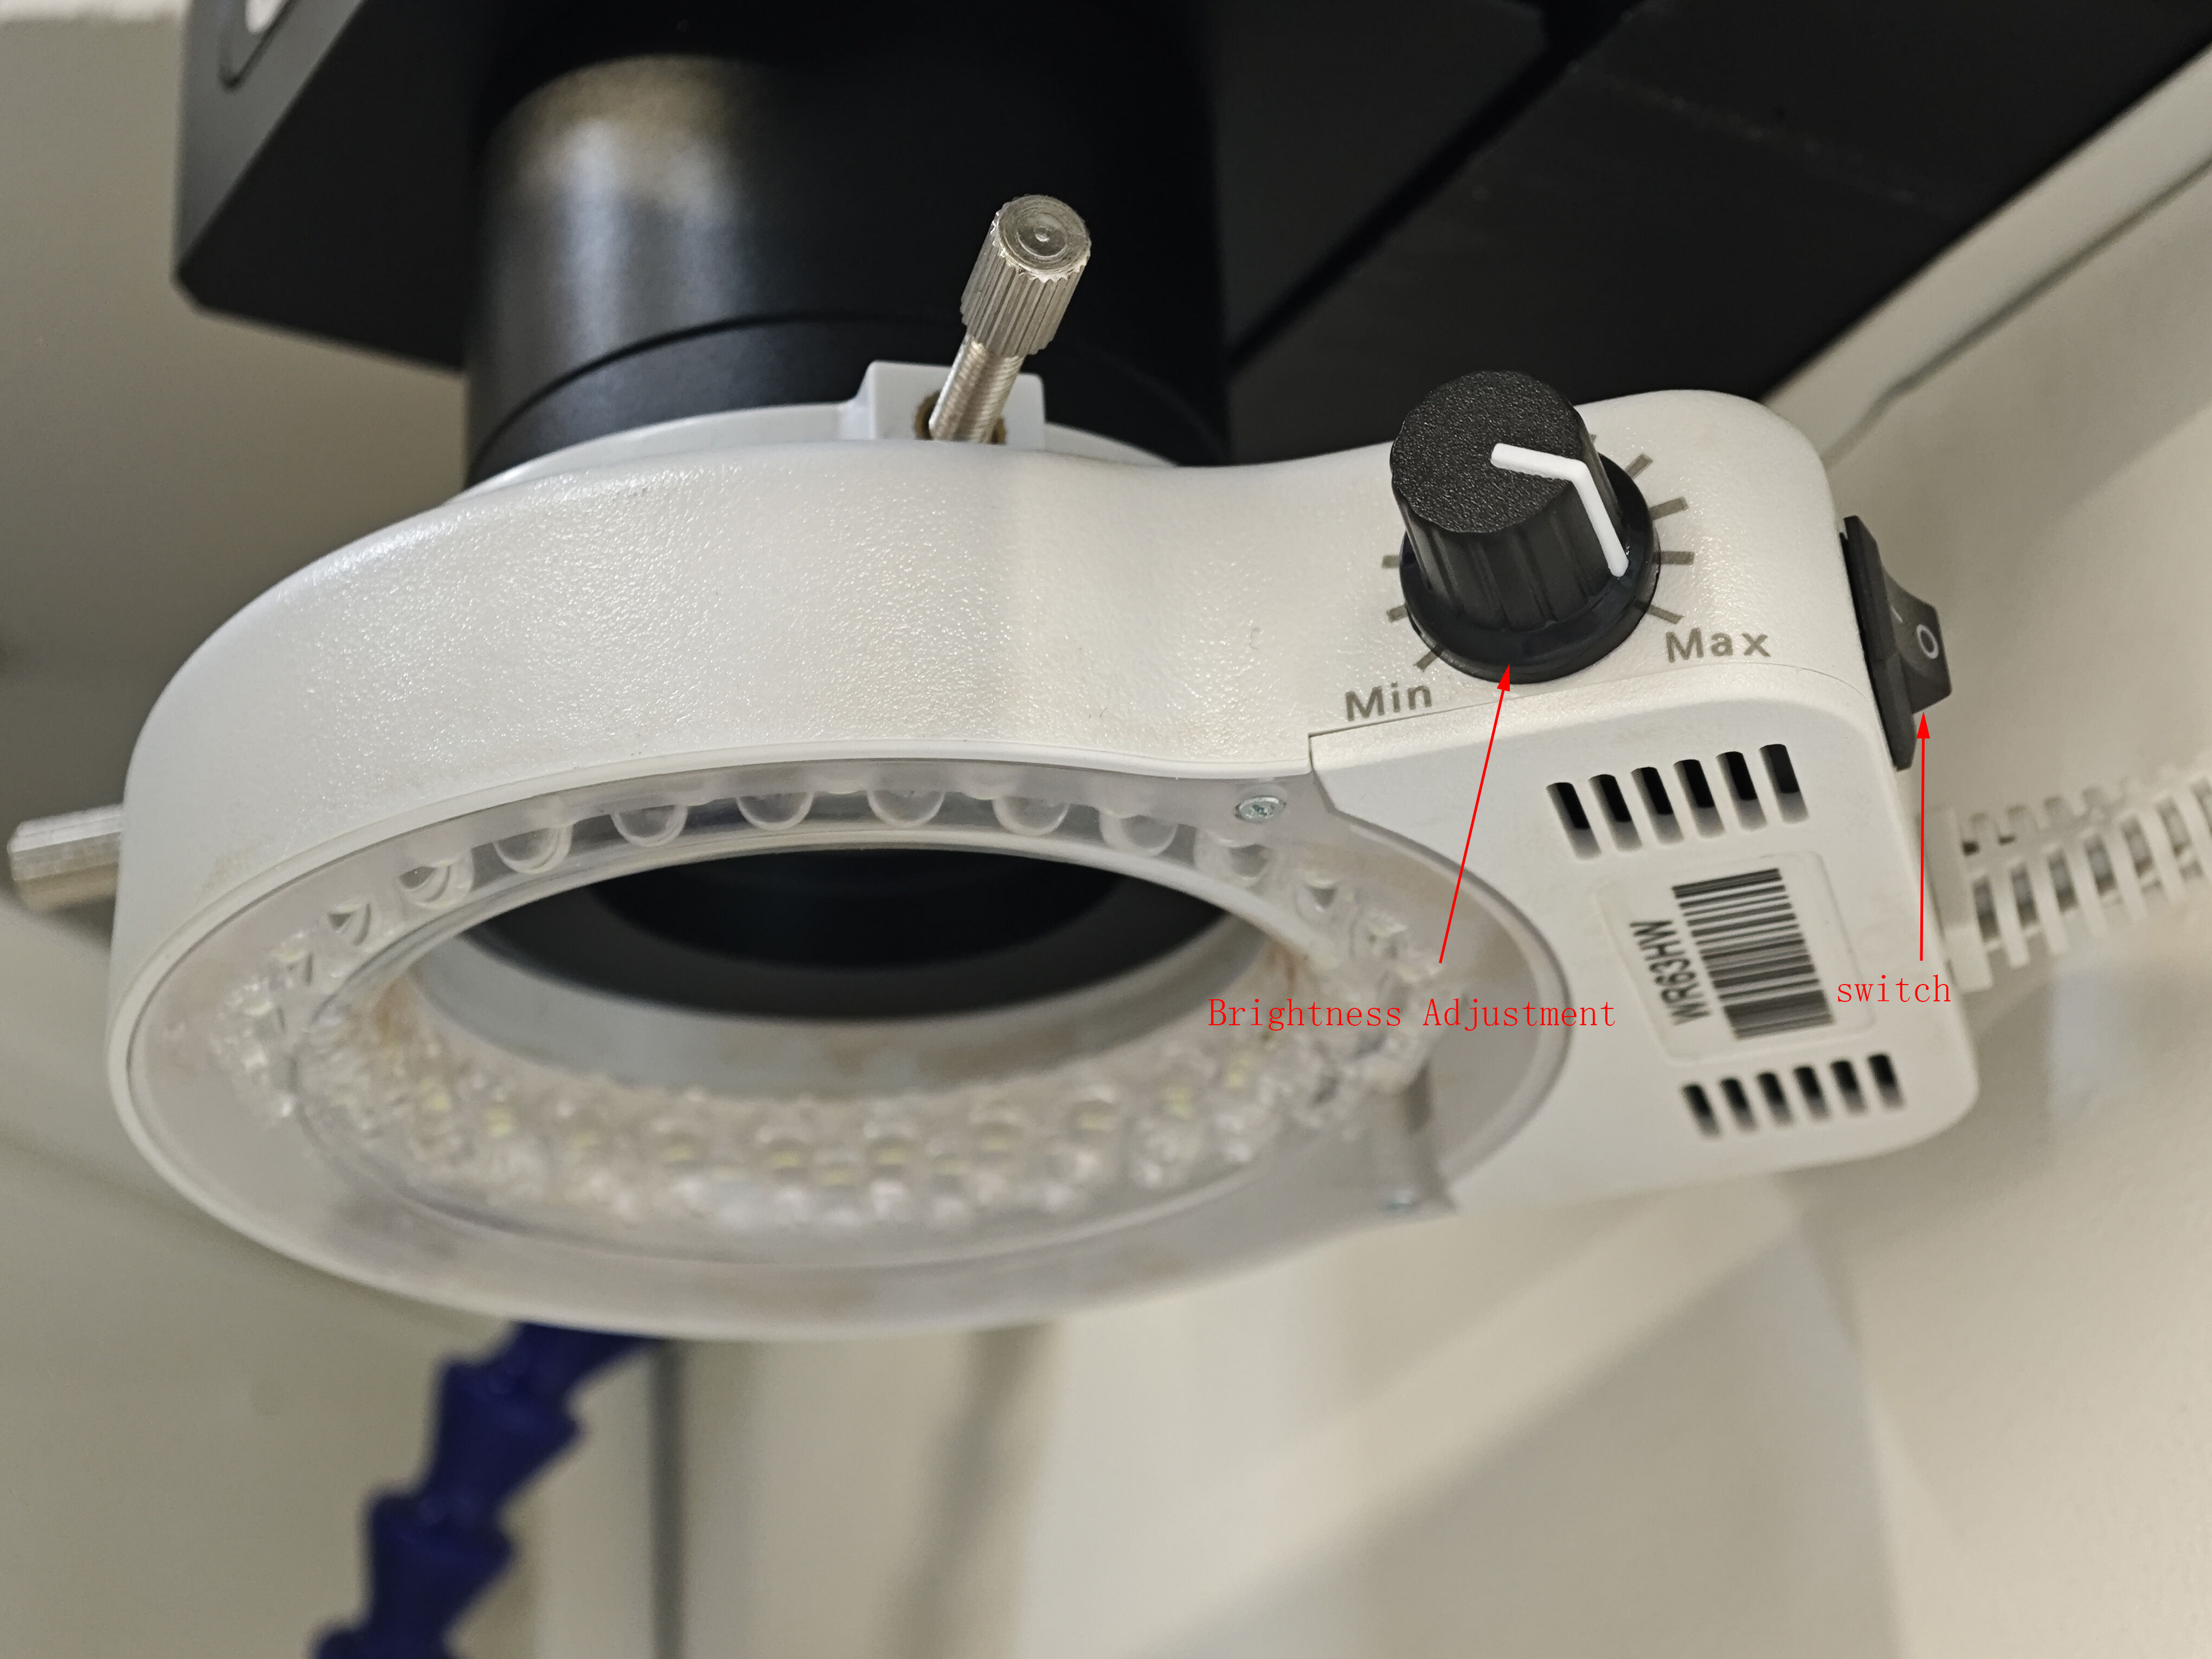
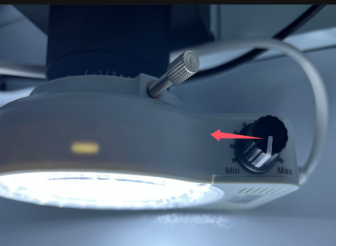
LED Lighting Fixture
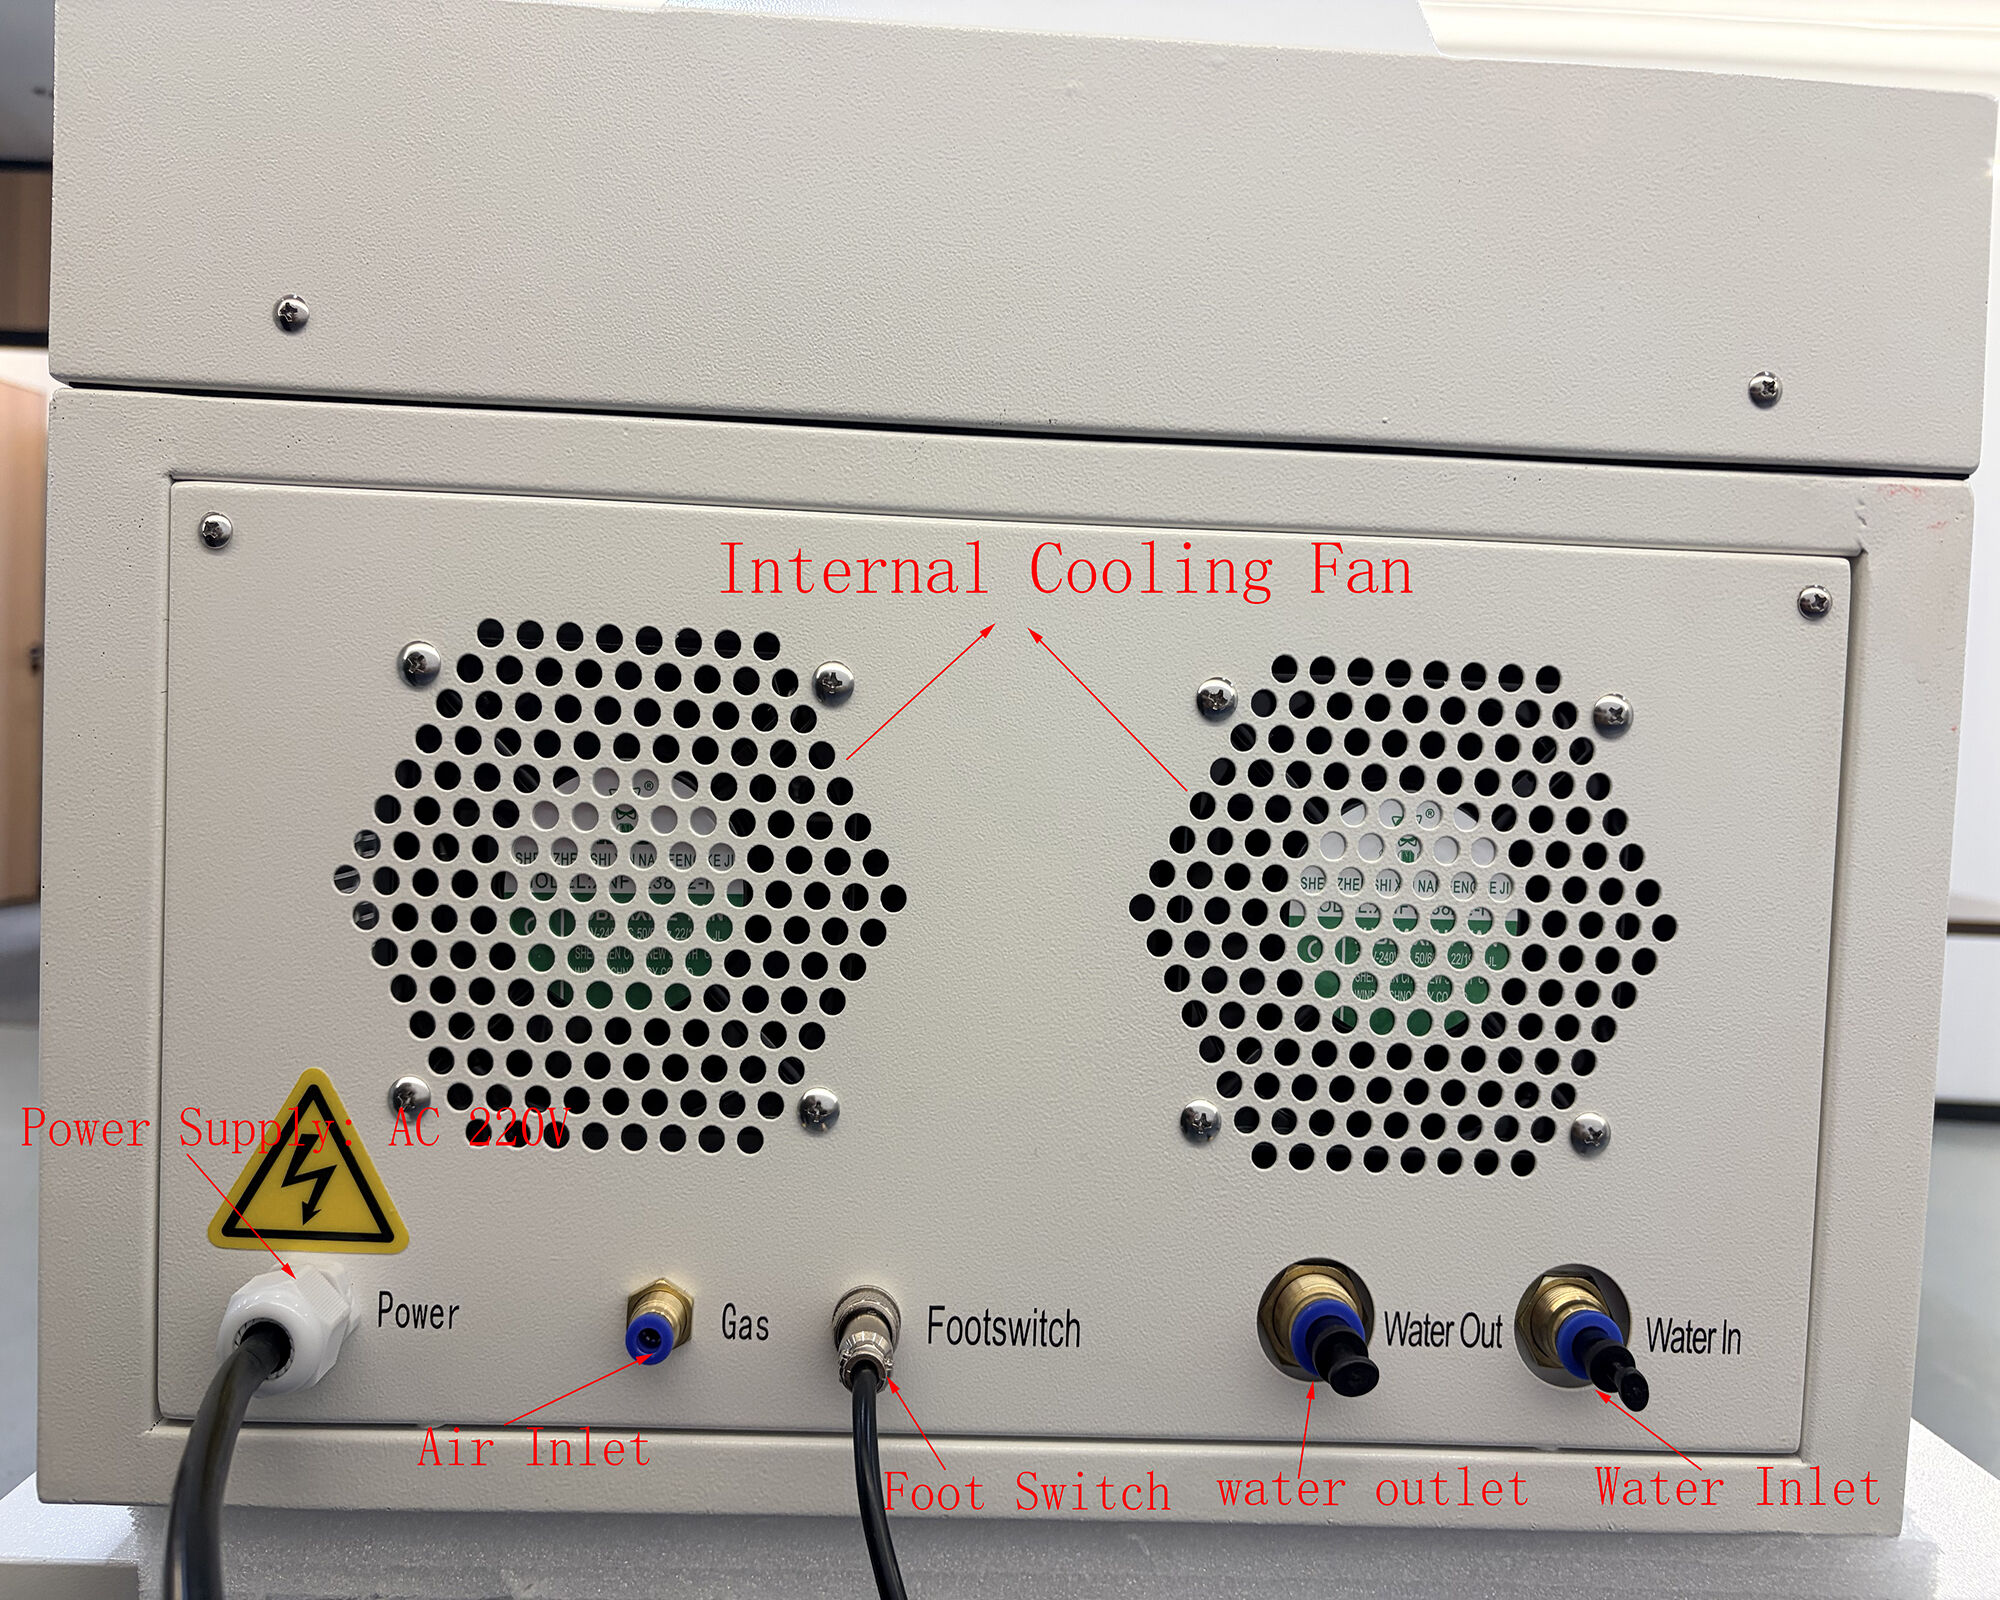
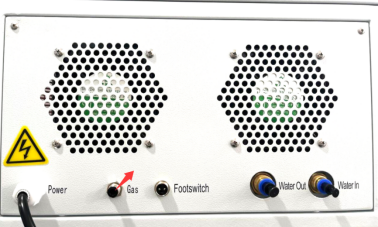
Rear Panel Function Overview
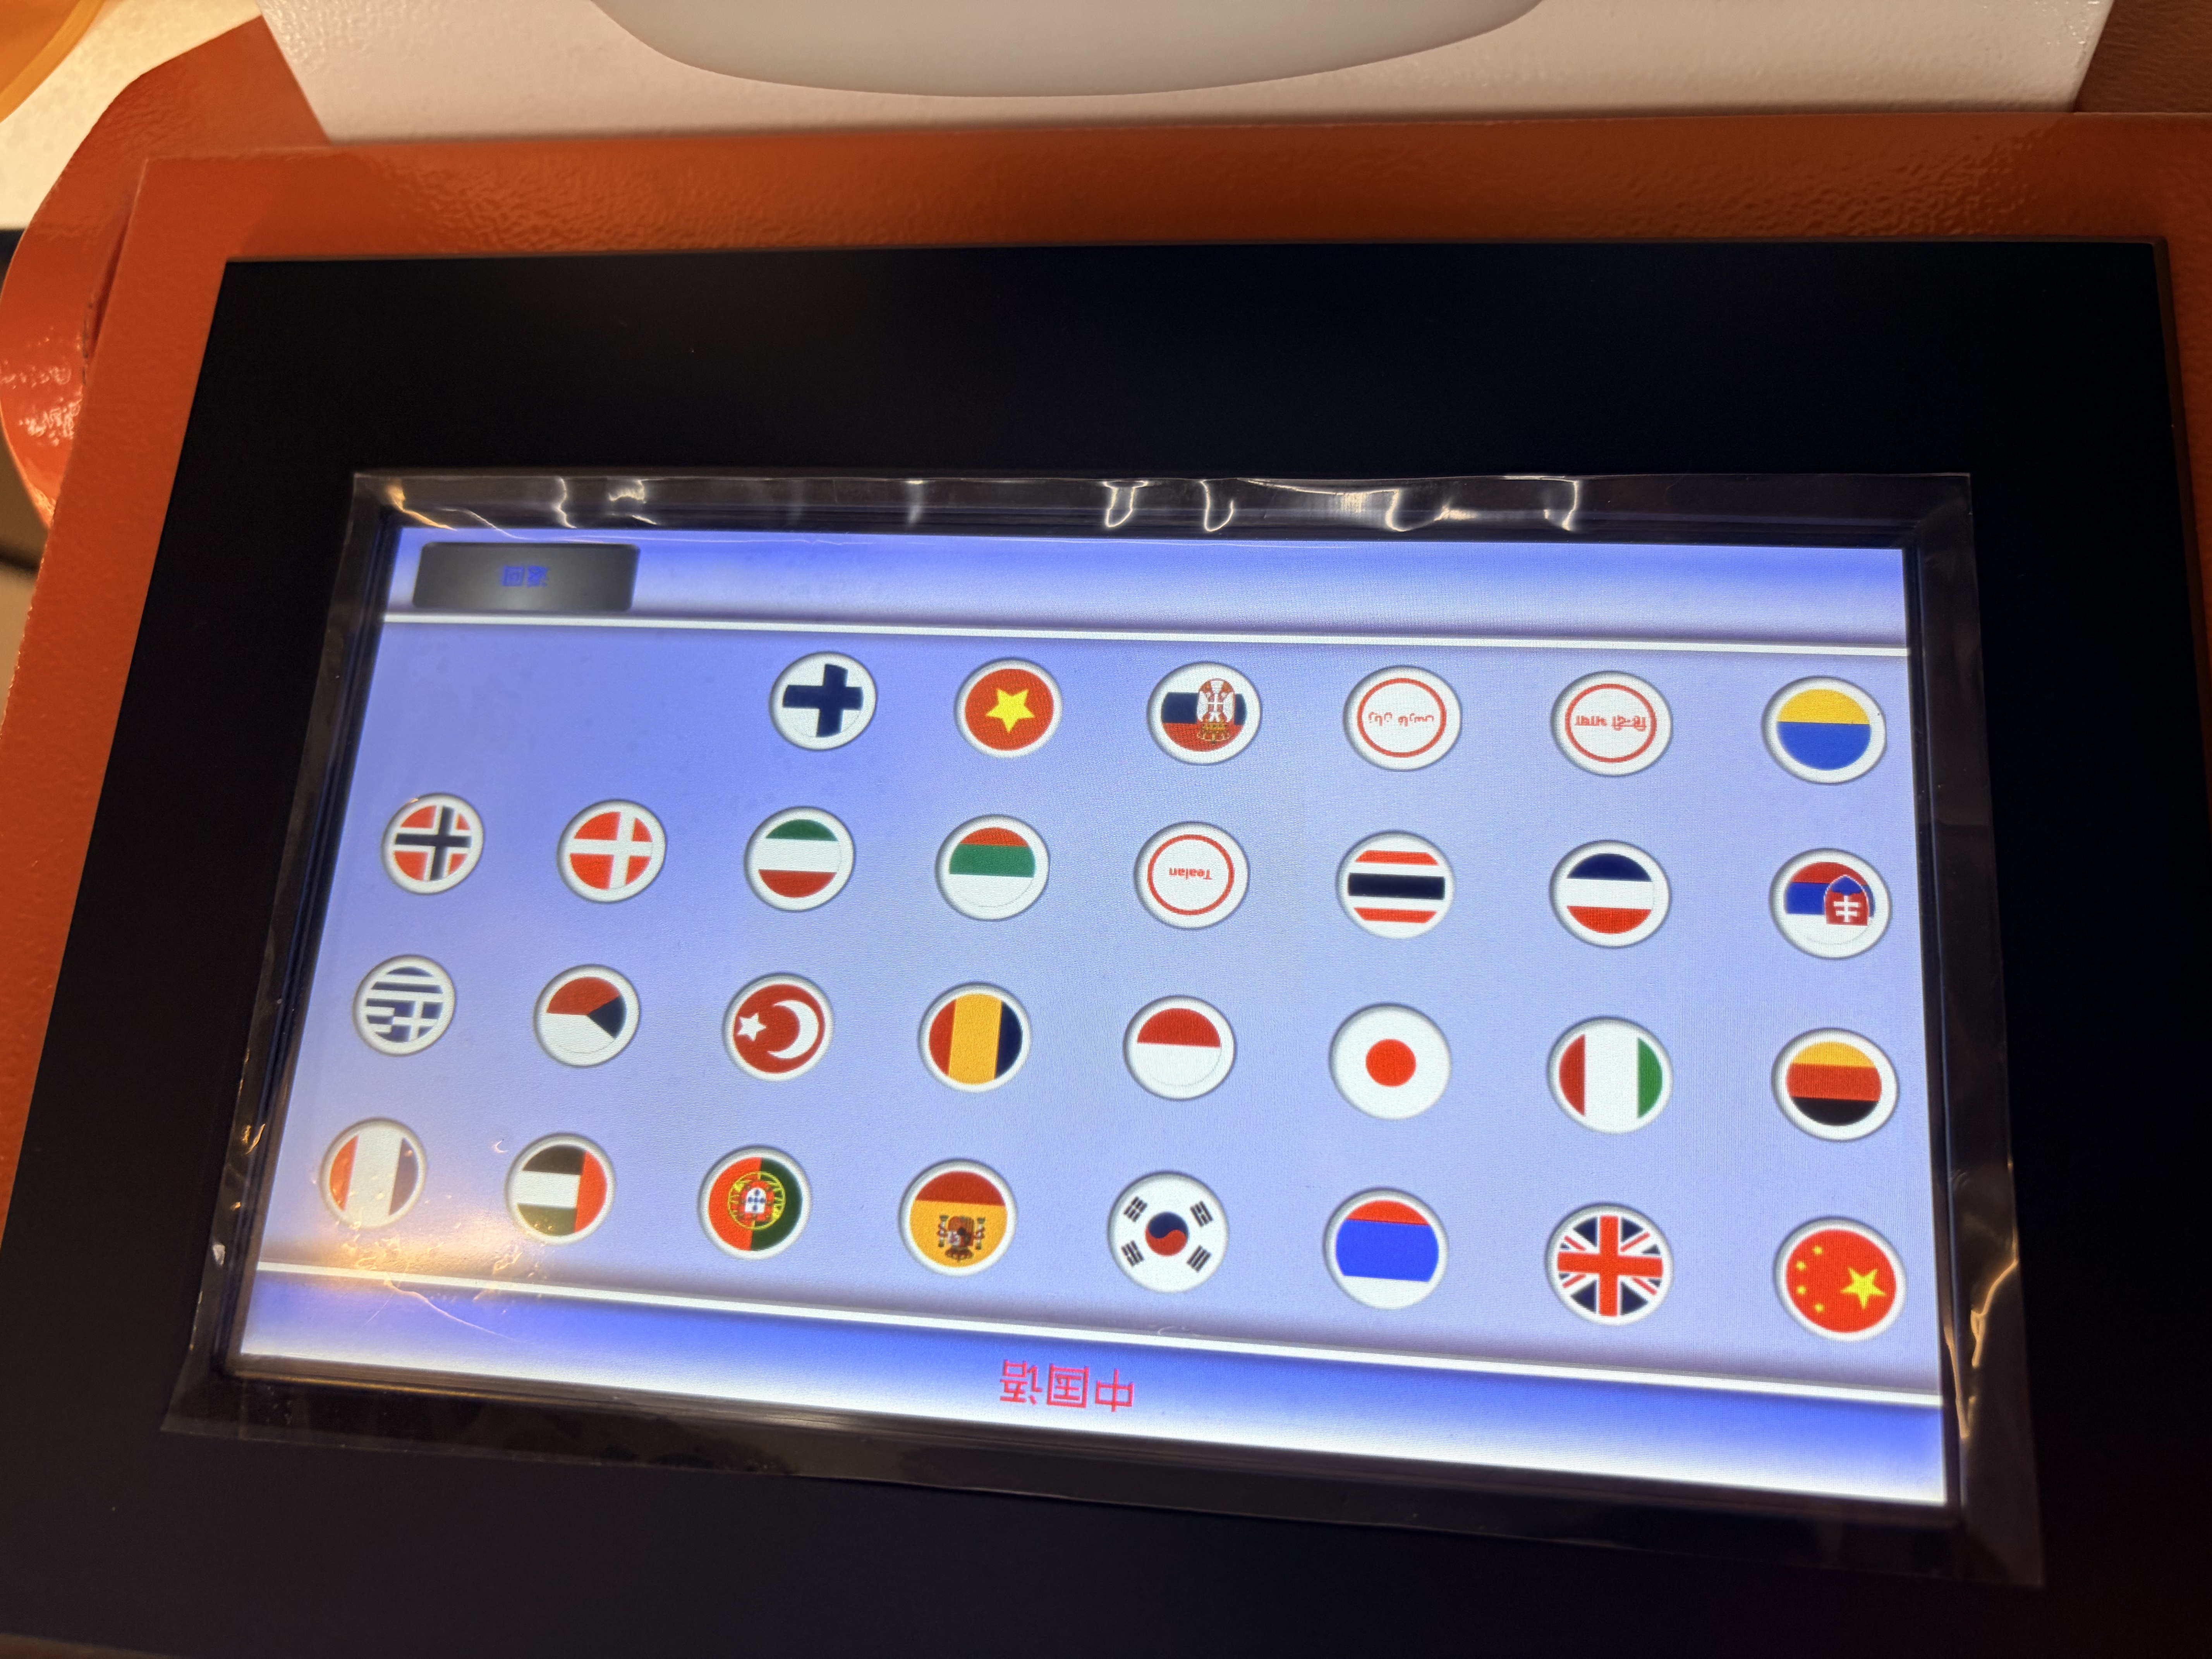
Supports Multiple Languages
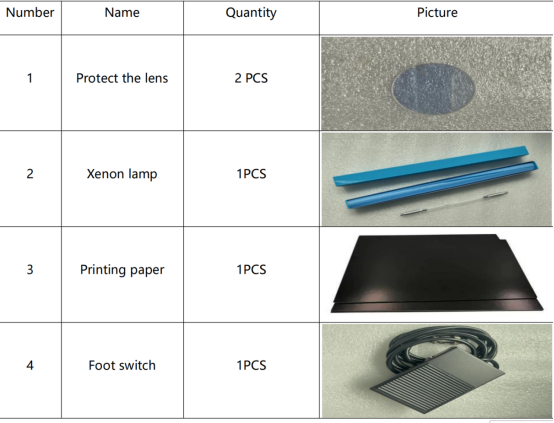
Standard Accessories
Product Parameter:
Machine model |
HS-JE200W |
Max laser power |
200W |
Laser type |
YAG |
Laser wavelength |
1064nm |
Capacity control |
1--100% |
Pulse width regulation |
0.1--20MS |
Laser welding frequenc |
1-50HZ |
Maximum single-pulse energy |
100J |
MIcroscope |
10X |
Instability of energy |
<2% |
Beam Divergence |
≤8mrad |
Welding the width |
0.4---3mm |
Welding the focal length |
F=110mm |
Continue working time |
16hours |
Noise |
≤60db |
Working temperature |
55°F(13°C)-95°F(35°C) |
Working Humidity |
5%-75% |
Oil mist |
≤15mg/m³ |
CCD |
720P CCD 7inches (with cross) |
Power required |
AC220V±10% 50HZ/60HZ |
Interiorinput power |
3KW |
Languages |
Chinese, English, Korean(Can be customized) |
Net size and weight |
800*500*550mm 65KG |
Package size and weight |
930*710*620mm 85KG |
Matters Need Attention:
1.First of all,confirm that the single working voltage of the machine is AC220V and the air switch current is 15-25A. The ground wire must be properly installed.
2.The working environment temperature is 10-35 degrees Celsius, in line with the humidity and air dust concentration of the machine.
3.The machine needs to be equipped with pure water or deionized water, and should be replaced regularly (even if not in use). The general replacement cycle is no more than 3 months, and it is recommended to replace once a month.
4.There is a high voltage power supply inside the machine, which needs to be disassembled and tested under the guidance of our technical personnel.
5.After the xenon lamp is replaced, the light spot needs to be adjusted. Please contact our technical personnel for specific operation.
6.When the machine is working normally, please ensure a good ventilation and heat dissipation environment, and do not block the heat dissipation port and ventilation port of the machine.
Installation and Operation:
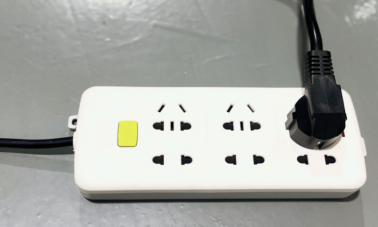
1.Connect the machine power cable to the external power supply, ensure that the single working voltage is AC220V, air switch current 15-25A, and the ground wire must be properly installed.

2.Connect one end of the water pipe to the filling port and the other end to the water. The machine needs to be filled with pure or deionized water and replaced regularly (even if it is not in use)
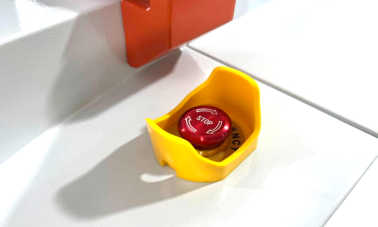
3.Pull the emergency stop switch

4.After the machine is powered on normally, the operation screen and lighting lamp are turned on, the refrigerator and fan of the machine rotate, and sound is heard
5.Press the "Add Water" switch to start the pump. When the tank is full, the pump will stop pumping automatically and press the switch to insert the rubber plug into the water filling port
6.Connect the pedal switch to the machine port.

7.The filling port can be equipped with argon gas according to the welding process requirements, and it can be not installed if it is not necessary. If the filling port is not installed, the welding place of the product will be yellow and black, which does not affect the welding quality. The machine has an automatic blowing function inside
Welding Operation :
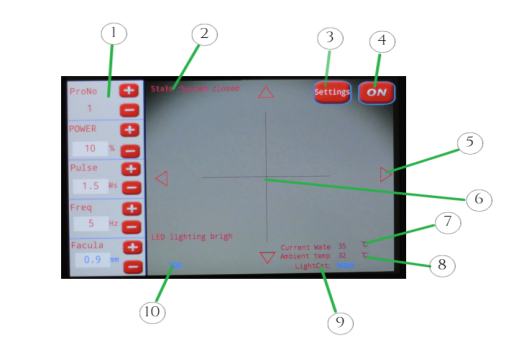
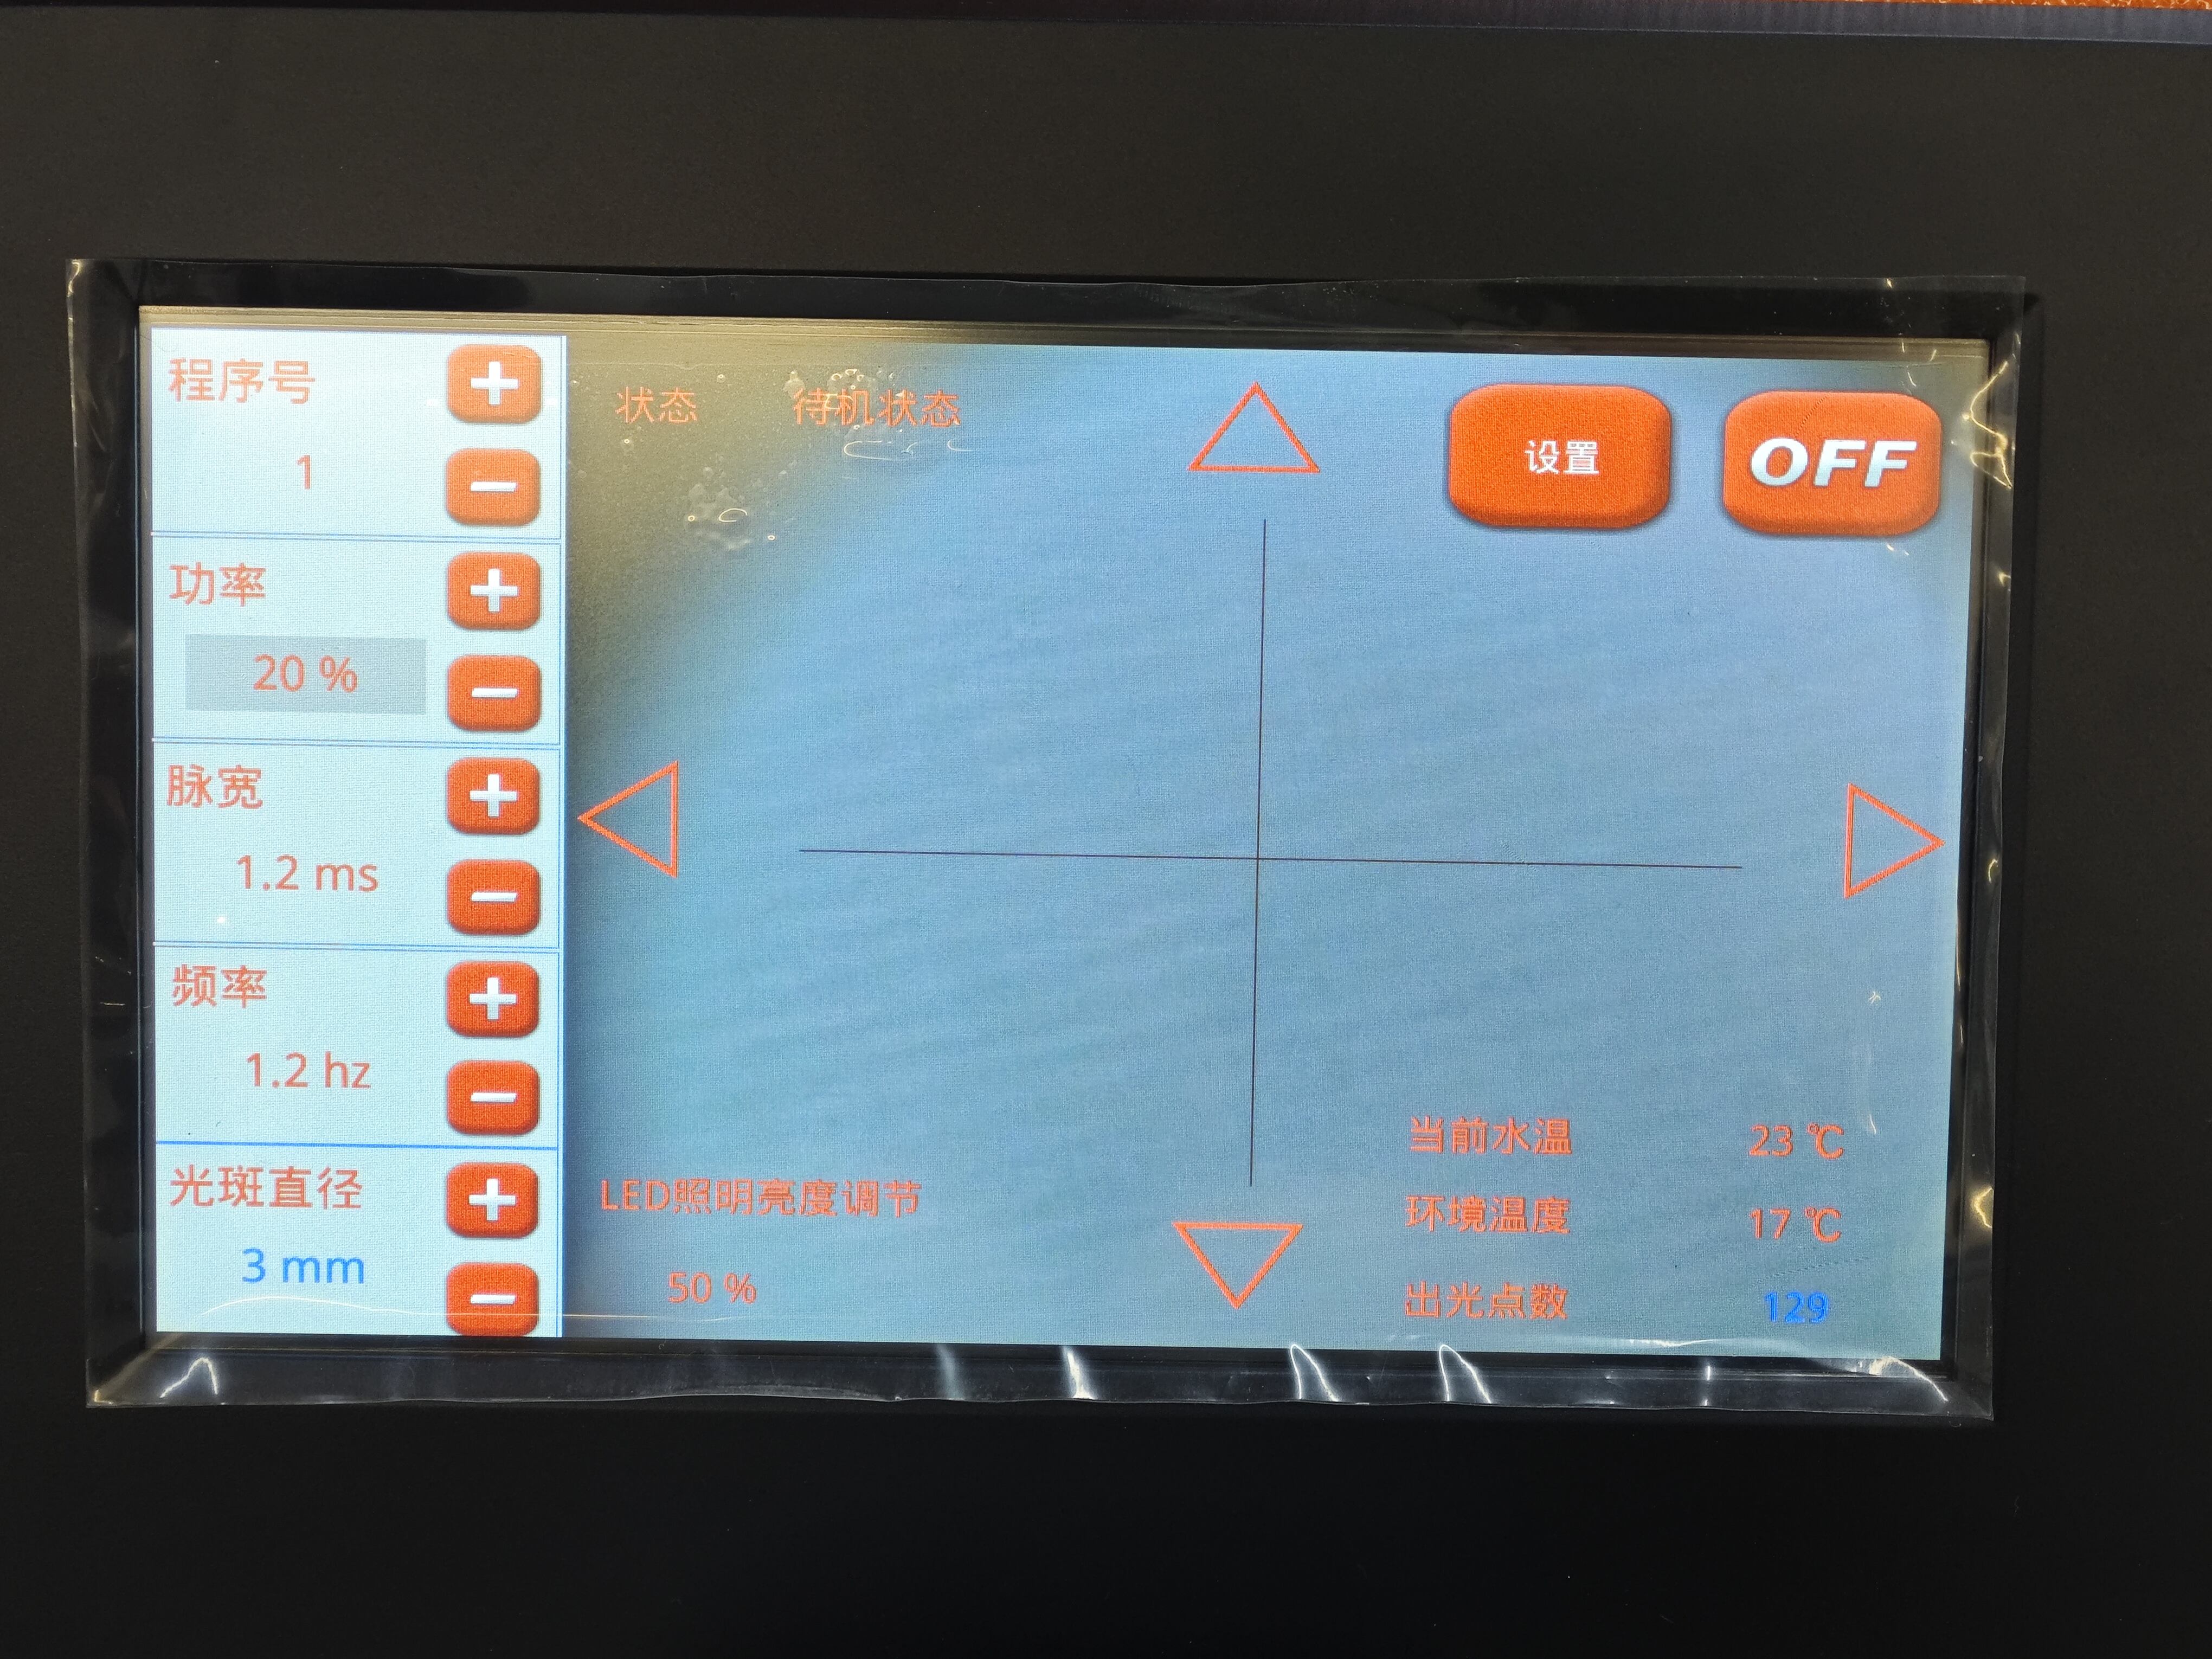
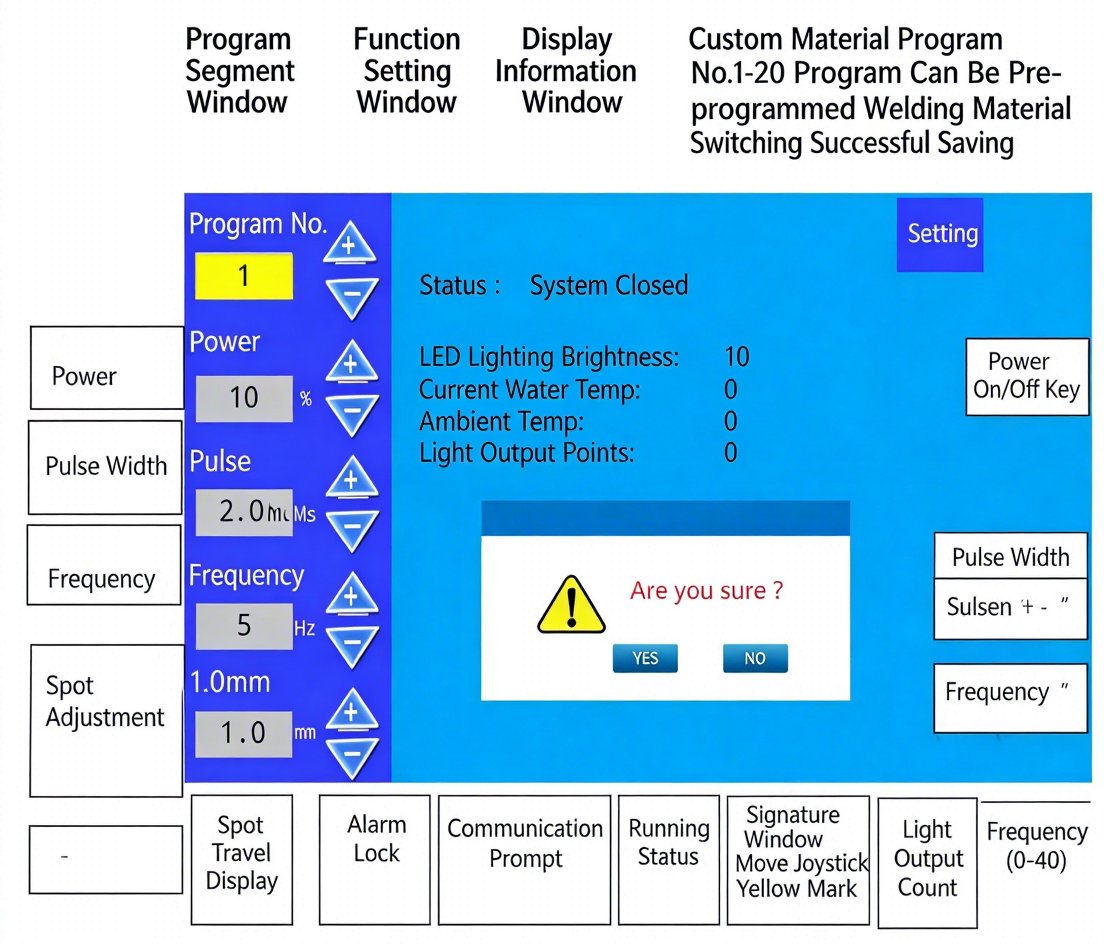
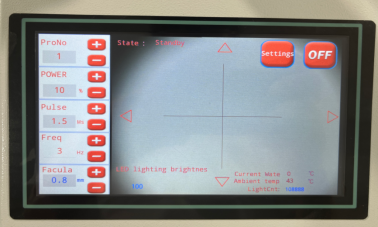
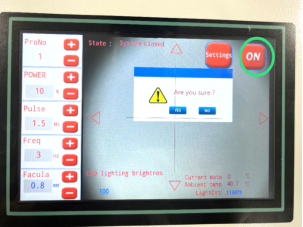
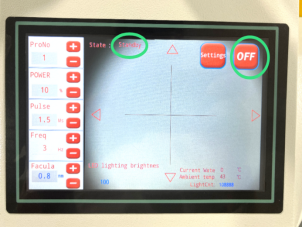
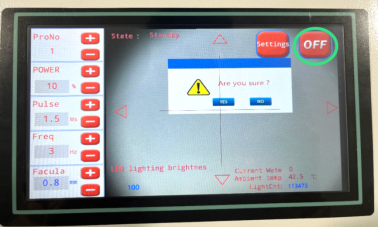
1、Introduction to interface functions
| Item | Designation |
| 1 | Display of the selected programme and the parameters |
| 2 | Machine startup status display |
| 3 | Setting and use of internal parameters in the machine |
| 4 | Power on and off switch button |
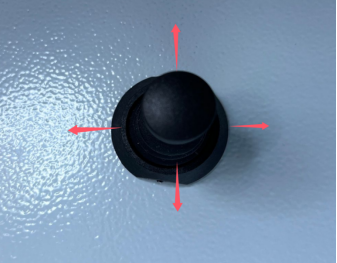
| 5 | Four direction keys, adjust the welding point is not in the center of the cross line |
| 6 | The center point of the cross line |
| 7 | Actual tank temperature display |
| 8 | Machine internal temperature display |
| 9 | Number of xenon lamp outputs |
| 10 | Lighting lamp brightness adjustment |
2.Click "ON" on the screen to start the machine inside. After about 60 seconds, the machine starts normally. Change "ON" to "OFF" and the status is displayed as standby. The welding parameters can be adjusted
3.Start the pedal switch and the laser will come out from the welding head
4.Observe the clearest part of the microscope with both eyes. There is a cross line in the right eyepiece, and the solder point is at the center of the cross line. You can also observe the cross line on the screen


5.The cross lever is adjusted in four directions: up, down, left and right to adjust the welding parameters
6.Adjust the brightness switch of the lighting lamp
Shutdown Procedure:
1.When the work is finished and you need to shut down, click "OFF" on the screen and follow the prompt. It will take about 5 seconds
2.Then press the emergency stop switch. The operation screen goes out
3.Unplug the power plug and disconnect the machine from the power supply
Routine Maintenance:
1. Keep the machine clean and tidy, and operate it in a suitable environment. Daily cleaning is required for the machine's exterior surfaces, microscope, and cooling vents (to remove dust and debris).
2. Do not subject the machine to external impacts from heavy objects, compression, or stacking.
3. Replace the cooling water once a month. Even if the machine has not been in use, the water must still be replaced, as it is prone to deterioration.
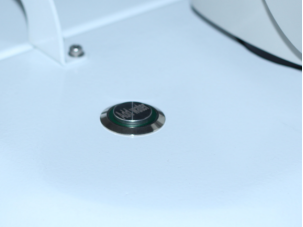
4. Clean the protective lens daily, or replace it every 2 to 6 months.
5. Inspect and calibrate the alignment between the microscope and the CCD crosshair center. The calibration procedure is as follows:
① First, ensure that the machine has been powered on successfully. Place the workpiece within the field of view of the observation system. Slowly adjust the focus to achieve the sharpest image possible, align the crosshair with the intended welding point, and then gently press the foot switch to initiate the laser output and perform the weld.
② If the laser spot does not appear at the exact center of the crosshair cursor while the CCD camera view is in sharp focus, you can adjust the position of the crosshair cursor. To do this, click on the midpoint of any of the four edges of the screen to shift the cursor's position, thereby centering the intended weld point within the cursor.
6. Replace the xenon lamp as needed, depending on usage frequency. After replacing the xenon lamp, use photosensitive paper to adjust and align the laser spot. For detailed instructions on this procedure, please consult the company's technical staff and request the instructional video.

Products Number: Small enclosed marking machine
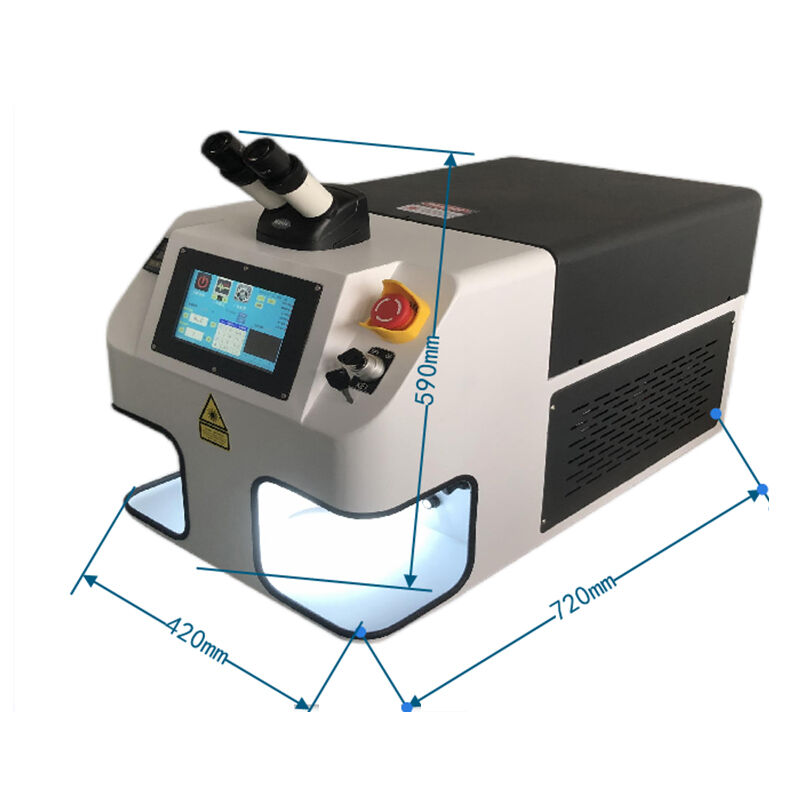
Products Number: Desktop laser welding machine
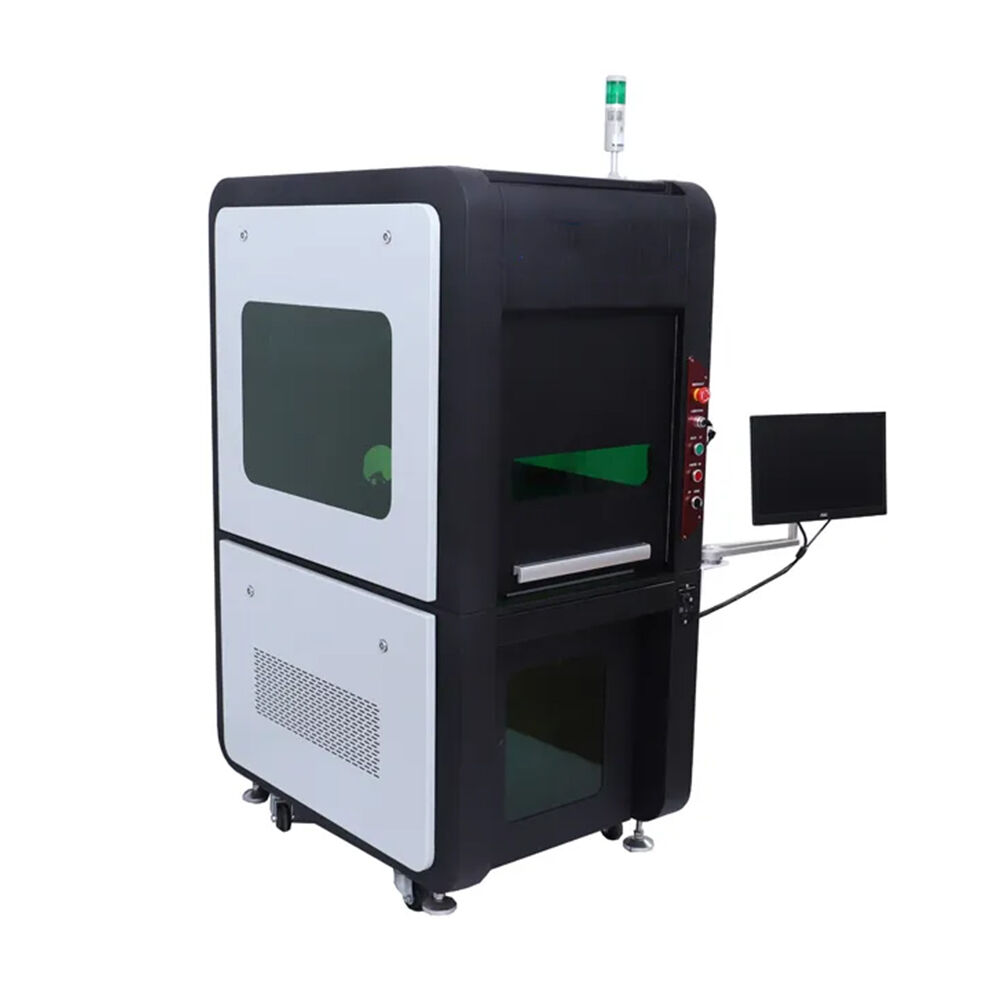
Products Number: Fully enclosed marking machine
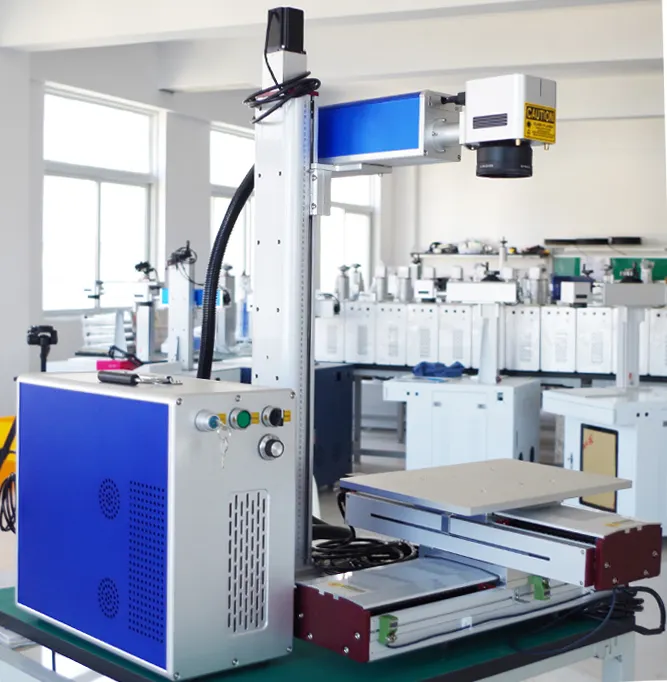
Products Number: Fiber optic laser marking machine
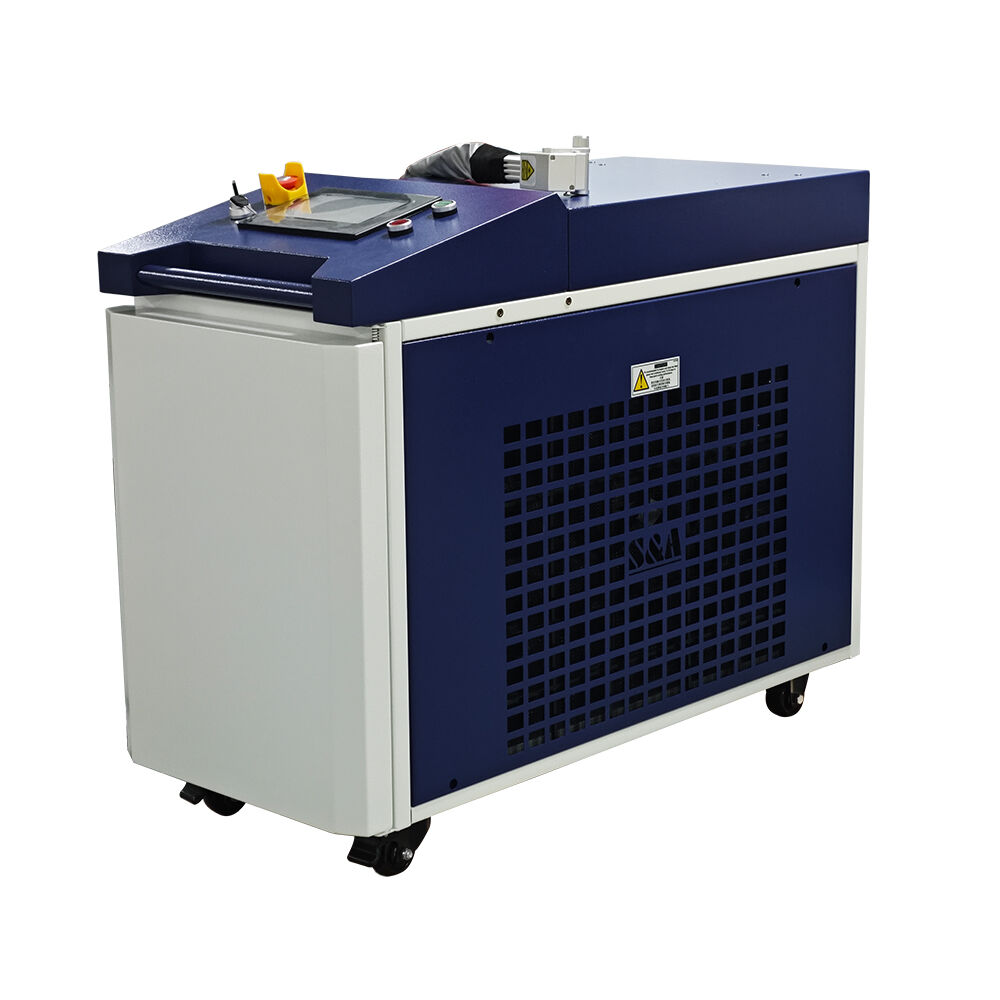
Products Number: Handheld laser welding machine
Products Number: Handheld Stainless Steel Fiber Mark Laser Engraving Machine